
]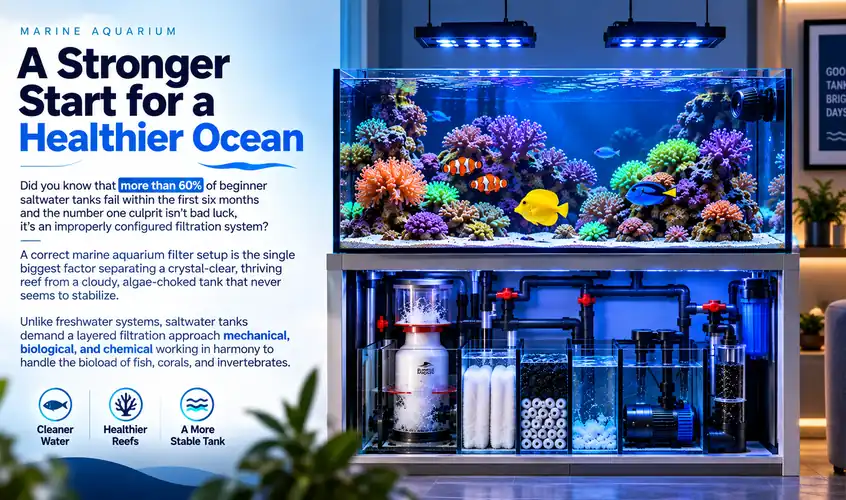
Did you know that more than 60% of beginner saltwater tanks fail within the first six months and the number one culprit isn’t bad luck, it’s an improperly configured filtration system? If you’re staring at a pile of equipment wondering where to even begin, you’re not alone.
A correct marine aquarium filter setup is the single biggest factor separating a crystal-clear, thriving reef from a cloudy, algae-choked tank that never seems to stabilize. Unlike freshwater systems, saltwater tanks demand a layered filtration approach mechanical, biological, and chemical working in harmony to handle the bioload of fish, corals, and invertebrates.
In this guide, you’ll learn:
- The exact filtration stages every marine tank needs (and why skipping one causes failure)
- How to choose between sumps, canister filters, HOBs, and protein skimmers
- A realistic saltwater aquarium setup cost breakdown for 2026
- Step-by-step DIY marine aquarium filter setup plans for budget-conscious hobbyists
- Whether you actually need a marine aquarium filter setup PDF — and where to get one
- A complete marine fish tank full setup checklist from tank to livestock
Whether you’re planning your first saltwater aquarium or upgrading an existing system, this guide covers everything the top-ranking articles miss—with U.S. pricing, U.S.-available equipment brands, and region-specific tips for American hobbyists. Let’s dive in.
1. Why Filtration Is the Foundation of Every Marine Aquarium
Saltwater ecosystems are far less forgiving than freshwater ones. Marine fish, corals, and invertebrates evolved in the ocean a system so vast that waste is diluted to near-zero concentrations almost instantly. Your tank has to replicate that stability in a few hundred liters of water, and filtration is the engine that makes it possible.
The Nitrogen Cycle: What Your Filter Is Actually Doing
Every marine aquarium filter setup exists to manage one core biological process: the nitrogen cycle. Fish waste, uneaten food, and decaying matter produce ammonia (NH3), which is highly toxic even in trace amounts. Beneficial bacteria convert ammonia into nitrite (NO2⁻), which is also toxic, and then into nitrate (NO3⁻), which is far less harmful but still needs to be exported through water changes, protein skimming, or macroalgae.
A functioning filter setup doesn’t just “clean” water it hosts the bacterial colonies responsible for this entire conversion process. Without adequate biological media, your tank cannot process bioload no matter how powerful your pump is.
Why Saltwater Tanks Need More Filtration Than Freshwater
Marine livestock is significantly more sensitive to water quality swings than freshwater fish. A 2 ppm ammonia spike that a goldfish might tolerate for a few hours can kill a clownfish or damage coral tissue within minutes. This is why marine setups typically require:
- Higher turnover rates (aim for 510x total tank volume per hour)
- Multi-stage filtration rather than a single filter
- Protein skimming to remove organics before they even break down
- More generous biological media capacity relative to tank size
The Cost of Getting Filtration Wrong
Underfiltering is the leading cause of new tank syndrome, cyanobacteria outbreaks, and coral bleaching in beginner systems. Overfiltering, while rarer, can strip essential trace elements and starve corals of the nutrients they need. The goal is balance which is exactly what the rest of this guide will help you achieve.
Fish-Only vs. Reef: Why Your Livestock Choice Changes Everything
Most competing guides treat filtration as a one-size-fits-all topic, but a fish-only with live rock (FOWLR) system and a reef tank have meaningfully different filtration priorities.
A FOWLR system tolerates slightly higher nutrient levels because fish are more forgiving of nitrate than most coral species. Filtration here can lean more heavily on mechanical and biological stages, with a protein skimmer as a strong recommendation rather than a hard requirement.
A reef tank, by contrast, needs nutrients kept in a much tighter band typically nitrate under 5–10 ppm and phosphate under 0.1 ppm for most SPS (small polyp stony) corals to thrive. This makes protein skimming, GFO reactors, and refugiums with macroalgae far more central to the marine aquarium filter setup than they would be for a fish-only tank. If you’re planning to keep corals eventually, it’s almost always cheaper to build reef-capable filtration from day one rather than retrofitting later.
How Bioload Actually Scales With Tank Size
A mistake many beginners make is assuming filtration needs scale linearly with gallons. In reality, smaller tanks are less forgiving per gallon because they have a smaller total water volume to dilute toxins. A 10-gallon nano tank with two small fish can experience an ammonia spike far faster than a 75-gallon tank with the same bioload, simply because there’s less water to buffer the change. This is why experienced reefers often recommend beginners start with at least a 40-gallon system it provides a wider margin for error while your filtration and husbandry skills develop.
2. Understanding the 3 Types of Marine Aquarium Filtration
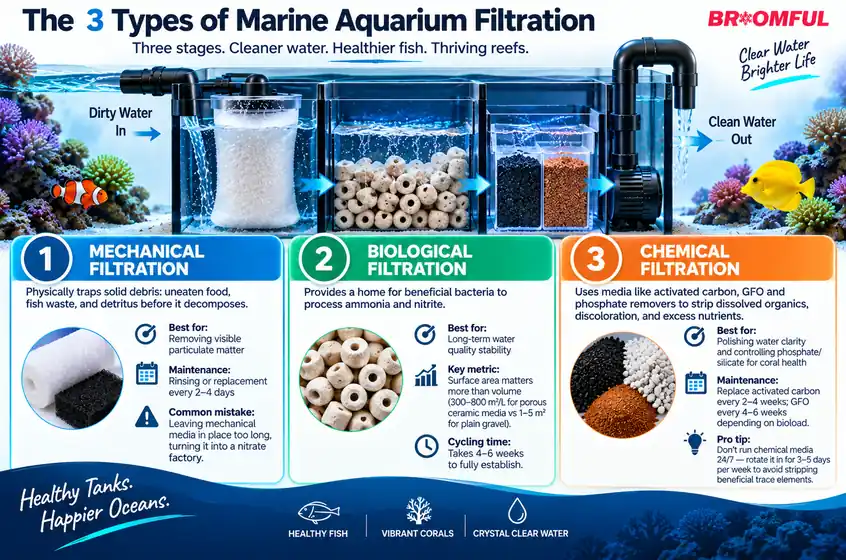
Every reliable marine aquarium filter setup regardless of brand or budget relies on three distinct filtration stages working together.
Mechanical Filtration
Mechanical filtration physically traps solid debris: uneaten food, fish waste, and detritus before it decomposes and pollutes the water column. This typically happens via filter floss, filter socks, or sponge pads, and should be the first stage water passes through.
- Best for: Removing visible particulate matter
- Maintenance: Requires rinsing or replacement every 2–4 days to prevent it becoming a nitrate factory itself
- Common mistake: Leaving mechanical media in place too long, which turns a filter into a source of pollution rather than a solution
Biological Filtration
This is the heart of any marine aquarium filter setup. Biological media live rock, bio-balls, ceramic rings, or bio-media blocks provides surface area for nitrifying bacteria to colonize and process ammonia and nitrite.
- Best for: Long-term water quality stability
- Key metric: Surface area matters more than volume; porous ceramic media can offer 300–800 m² of surface area per liter compared to roughly 1–5 m² for plain gravel
- Cycling time: A new biological filter typically takes 4–6 weeks to fully establish (this is the “cycling” phase every beginner must complete before adding fish)
Chemical Filtration
Chemical filtration uses media like activated carbon, GFO (granular ferric oxide), and phosphate removers to strip dissolved organics, discoloration, and excess nutrients that mechanical and biological stages can’t catch.
- Best for: Polishing water clarity and controlling phosphate/silicate for coral health
- Maintenance: Activated carbon should be replaced every 2–4 weeks; GFO every 4–6 weeks depending on bioload
- Pro tip: Never run chemical media 24/7 without pause — some hobbyists rotate it in for 3–5 days per week to avoid stripping beneficial trace elements
Comparison Table: Filtration Stages at a Glance
| Filtration Type | What It Removes | Common Media | Replacement Frequency | Skip It and… |
|---|---|---|---|---|
| Mechanical | Solid debris, uneaten food | Filter floss, filter socks, sponge | Every 2–4 days | Water clouds and nitrates spike faster |
| Biological | Ammonia, nitrite | Live rock, ceramic media, bio-balls | Never (just rinse in tank water) | Ammonia poisoning kills livestock |
| Chemical | Dissolved organics, phosphate, tannins | Activated carbon, GFO, resin | 2–6 weeks | Water yellows, algae and coral stress increase |
A Fourth Stage Most Guides Skip: Biological Export via Refugiums
While the three core stages above cover the essentials, advanced hobbyists add a fourth complementary stage: nutrient export via a refugium. A refugium is a separate compartment (usually in a sump) that grows macroalgae like chaetomorpha under dedicated lighting. As the algae grows, it consumes nitrate and phosphate directly from the water column, then gets pruned and discarded — physically removing nutrients from the system rather than just converting them between forms.
This matters because biological filtration alone only converts ammonia to nitrate; it doesn’t remove nitrogen from the tank. Without water changes, a skimmer, or a refugium, nitrate will climb indefinitely as bioload increases. A refugium is one of the most cost-effective ways to reduce how often you need to perform water changes, and it doubles as a natural food source and pod-breeding habitat for fish.
How to Know If Your Biological Filtration Capacity Is Enough
A practical benchmark competing guides rarely mention: aim for roughly 1–2 lbs of live rock (or equivalent porous dry rock/ceramic media) per gallon of total system volume for a lightly to moderately stocked tank. Heavily stocked fish-only systems may need to lean closer to 2 lbs per gallon, while reef tanks with additional refugium macroalgae can sometimes run slightly less rock since the algae shares nutrient export duties.
Choosing the best marine aquarium filter setup depends on your tank size, budget, and whether you’re running a fish-only system or a reef with corals. Here’s an honest breakdown of every major option.
Sump Systems (Best for Serious Hobbyists)
A sump is a secondary tank, usually housed in the stand below the display tank, that holds filtration equipment, a protein skimmer, and a refugium out of sight.
Pros:
- Massive water volume increase improves overall stability
- Hides equipment, heaters, and dosing pumps
- Easiest platform to add a refugium for natural nutrient export
Cons:
- Requires drilling the tank or an overflow box
- Higher upfront cost ($150–$600+ depending on size)
- More plumbing knowledge required
Canister Filters (Best for Fish-Only Tanks)
External canister filters pump water through multiple internal media baskets (mechanical, biological, chemical) before returning it to the tank.
Pros:
- Excellent mechanical and chemical filtration capacity
- No drilling required
- Quiet operation
Cons:
- Limited biological capacity compared to a sump with live rock
- Not ideal for reef tanks needing high flow and skimming
Hang-On-Back (HOB) Filters (Best for Nano Tanks)
HOB filters clip onto the back of the tank, pulling water up through cartridges before returning it via gravity.
Pros:
- Cheapest entry point ($20–$80)
- Extremely easy to install and maintain
- Ideal for tanks under 40 gallons
Cons:
- Limited capacity for larger bioloads
- Cartridges need frequent replacement
- Not powerful enough for most reef setups
All-in-One (AIO) Tanks (Best for Beginners)
AIO tanks come with a built-in rear chamber that mimics a mini-sump, often including a filter sock, media basket, and return pump.
Pros:
- Simplifies the entire saltwater aquarium for beginners experience
- Compact footprint with hidden equipment
- Often reef-ready out of the box
Cons:
- Smaller water volume limits stability at scale
- Upgrading equipment later can be cramped
Comparison Table: Filter Setup Options
| Filter Type | Best For | Avg. Cost | Reef-Capable | Difficulty |
|---|---|---|---|---|
| Sump System | 40+ gallon reef tanks | $150–$600 | Yes | Advanced |
| Canister Filter | Fish-only 20–75 gal | $80–$250 | Limited | Intermediate |
| HOB Filter | Nano tanks under 40 gal | $20–$80 | No | Beginner |
| All-in-One (AIO) | Beginners, desktop reefs | $200–$700 (tank incl.) | Yes | Beginner |
| DIY Sump/Filter | Any size, budget builds | $40–$150 | Yes | Intermediate |
Wet/Dry Trickle Filters: A Legacy Option Worth Understanding
Older marine setups often used wet/dry trickle filters, where water trickles over bio-balls exposed to air, maximizing oxygen contact for nitrifying bacteria. While highly effective at ammonia-to-nitrite-to-nitrate conversion, trickle filters have fallen out of favor in modern reef keeping because they’re extremely efficient at producing nitrate but do nothing to export it. Many long-time hobbyists who still run older systems eventually remove bio-balls in favor of live rock or refugium-based nutrient export specifically to bring nitrate levels down. If you inherit or purchase a used system with a wet/dry filter, it’s worth understanding this trade-off before relying on it as your sole biological stage.
Matching Filter Type to Livestock Goals
| Your Goal | Recommended Filter Setup | Why |
|---|---|---|
| Fish-only nano tank | HOB or AIO | Simplicity and low bioload needs |
| FOWLR (fish + live rock) | Canister or AIO with strong bio media | Balanced mechanical/biological capacity |
| Soft coral reef | AIO or small sump with skimmer | Moderate nutrient control needed |
| SPS-dominant reef | Sump with skimmer, GFO reactor, refugium | Tight nutrient control essential |
| Budget-conscious any size | DIY sump | Full customization at lower cost |
4. Step-by-Step Marine Aquarium Filter Setup Guide
Follow this sequence exactly the order matters more than most guides admit, because doing steps out of order is a leading cause of cycling failures.
Step 1: Position and Plumb Your Equipment
Place your sump or canister filter in its final location before adding water. For sump systems, install the overflow box and check that drain and return plumbing are secure and leak-tested with fresh water first.
Step 2: Add Mechanical Media
Insert filter socks or floss into the first chamber. This stage should always be first in line so debris never reaches your pump or biological media.
Step 3: Add Biological Media (Live Rock or Dry Rock)
Place live rock, dry rock, or ceramic biological media in the designated chamber or display tank. If using dry rock, you’ll need to seed it with bacteria (bottled or from a mature tank) to jump-start cycling.
Step 4: Install the Protein Skimmer
Position the skimmer in its own sump chamber if possible, ideally the first chamber after the display drain, so it processes the dirtiest water before it reaches biological media.
Step 5: Add Chemical Media
Place carbon or GFO in a media reactor or mesh bag positioned in a flow path — but not so aggressive that it out-competes biological colonization during early cycling.
Step 6: Fill With Saltwater and Test Flow
Mix saltwater to a specific gravity of 1.023–1.025 using a calibrated refractometer, then fill the system. Run pumps for 24–48 hours to check for leaks and confirm turnover rate.
Step 7: Cycle the Tank
Add an ammonia source (fish food, pure ammonia, or a hardy starter fish) and test daily. Expect:
- Week 1–2: Ammonia rises, nitrite begins appearing
- Week 3–4: Nitrite peaks then crashes as nitrite-oxidizing bacteria establish
- Week 4–6: Nitrate appears and ammonia/nitrite read zero — your tank is cycled
Step 8: Add Livestock Gradually
Add one or two hardy fish first, waiting 2–3 weeks between additions to avoid overwhelming your newly established bacteria colony.
Step 9: Establish a Long-Term Testing Rhythm
Once your marine aquarium filter setup is cycled and stocked, shift from daily testing to a sustainable weekly rhythm. Test ammonia and nitrite only if you notice unusual fish behavior, algae, or after adding new livestock. Continue testing nitrate, pH, alkalinity, calcium, and magnesium weekly if you’re running a reef tank, since coral growth consumes these elements and they need periodic dosing or supplementation to stay in range.
Common Beginner Question: Live Rock vs. Dry Rock for Cycling
Live rock ships already colonized with beneficial bacteria (and sometimes hitchhiker pests), which can speed up cycling to as little as 2–3 weeks. Dry rock is cheaper, pest-free, and more widely available, but requires seeding with bottled bacteria or established tank water, typically extending the cycle to the full 4–6 week range. Most modern hobbyists choose dry rock for cost and biosecurity reasons, accepting the longer cycle time as a worthwhile trade-off.
5. DIY Marine Aquarium Filter Setup: Budget-Friendly Builds
You don’t need a $500 sump to run excellent filtration. A DIY marine aquarium filter setup can match commercial performance at a fraction of the cost if built correctly.
DIY Sump Build (Under $100)
Using a plastic storage tote or a used 20-gallon tank, you can build a functional 3-chamber sump:
- Chamber 1: Filter sock or floss for mechanical filtration
- Chamber 2: Protein skimmer plus biological media (ceramic rings or live rock rubble)
- Chamber 3: Return pump chamber, optionally with chemical media in a mesh bag
Materials needed: Acrylic or glass baffles (or repurposed plastic dividers), a return pump rated for your tank’s turnover needs, and basic silicone sealant.
DIY HOB Filter Upgrade
For hobbyists already running an HOB filter, you can dramatically improve biological capacity by:
- Replacing stock cartridges with reusable mesh bags filled with ceramic bio-media
- Adding a pre-filter sponge to the intake to extend media life
- Running carbon in a separate mesh bag rather than pre-packaged cartridges (cheaper and more effective)
DIY Protein Skimmer (Advanced)
While not recommended for total beginners, experienced reefers can build a basic venturi skimmer from PVC piping, an air pump, and a needle-wheel impeller pump for roughly $40–$60 versus $150+ for commercial units. This requires precise bubble diffusion tuning and is best attempted after you’ve run at least one full commercial setup to understand target performance.
When DIY Makes Sense vs. When It Doesn’t
| Scenario | DIY Recommended? | Why |
|---|---|---|
| First-time saltwater aquarium for beginners | Partial DIY only | Focus budget on livestock safety first |
| Budget-conscious hobbyist with tools | Yes | Full DIY sump can save $200+ |
| Reef tank with sensitive SPS corals | No, buy commercial skimmer | Stability matters more than savings |
| Nano tank under 20 gallons | Yes, DIY HOB upgrade | Simple, low-risk modification |
6. Saltwater Aquarium Setup Cost Breakdown (2026)
One of the most searched questions from beginners is simply: how much does this actually cost? Here’s a realistic saltwater aquarium setup cost breakdown across three budget tiers.
Budget Tier: Nano Fish-Only Tank (10–20 Gallons)
| Item | Estimated Cost |
|---|---|
| Tank + stand | $80–$150 |
| HOB or AIO filter | $30–$100 |
| Heater + thermometer | $25–$40 |
| Protein skimmer (optional at this size) | $0–$60 |
| Live rock/sand | $40–$80 |
| Saltwater mix + refractometer | $30–$50 |
| Lighting (basic LED) | $30–$70 |
| Total | $235–$550 |
Mid Tier: Standard Reef Tank (40–75 Gallons)
| Item | Estimated Cost |
|---|---|
| Tank + stand | $300–$600 |
| Sump + return pump | $150–$300 |
| Protein skimmer | $100–$250 |
| Live rock/sand | $150–$300 |
| Reef-capable LED lighting | $150–$400 |
| Heater + controller | $50–$100 |
| Testing kit | $40–$80 |
| Total | $940–$2,030 |
Advanced Tier: Large Reef System (100+ Gallons)
| Item | Estimated Cost |
|---|---|
| Tank + stand (custom or drilled) | $800–$2,000 |
| Sump + advanced return pump | $300–$700 |
| High-end protein skimmer | $250–$600 |
| Dosing/ATO systems | $150–$400 |
| Premium reef lighting | $400–$1,200 |
| Live rock/sand | $300–$700 |
| Controller/monitoring system | $200–$600 |
| Total | $2,400–$6,200 |
Hidden Ongoing Costs Most Guides Ignore
Beyond the initial marine aquarium filter setup, budget for recurring expenses that catch beginners off guard:
- Replacement bulbs every 12–18 months ($50–$150)
- Salt mix refills for water changes ($1–$2 per gallon monthly)
- Filter media replacement ($10–$30/month)
- Electricity for pumps, heaters, and lighting (often $10–$25/month depending on tank size)
Ways to Reduce Setup Cost Without Cutting Corners on Filtration
If budget is tight, the smartest place to save is not filtration — it’s cosmetic upgrades like premium aquascaping rock, designer stands, or top-tier lighting brands. Consider these cost-saving strategies that don’t compromise water quality:
- Buy a used tank and stand locally, but always purchase a new or thoroughly inspected filter, skimmer, and pumps
- Start with dry rock instead of live rock to save 30–50% on rock costs, accepting a longer cycle time
- Build a DIY sump rather than buying a commercial one, following the plans in Section 5
- Choose a mid-range protein skimmer over a premium brand; skimmer efficiency differences matter more at scale (100+ gallons) than in smaller systems
Where U.S. Hobbyists Buy Equipment and Livestock
American hobbyists have several reliable sourcing options, each suited to different budgets and needs:
- Big-box retailers (Petco, PetSmart): Best for basic equipment, test kits, and salt mix; convenient for same-day pickup but limited livestock selection
- Online specialty retailers (LiveAquaria, Marine Depot, Bulk Reef Supply): Best for live rock, corals, quarantined fish, and higher-end filtration equipment shipped overnight with temperature-controlled packaging
- Local fish stores (LFS): Best for inspecting livestock in person, getting hyper-local water chemistry advice, and picking up used equipment at a discount
- Reef club classifieds and forums (e.g., regional reef clubs on Facebook or Reef2Reef): Best for buying frags, used sumps, and skimmers well below retail price
Regional Climate Considerations Within the U.S.
Because the continental U.S. spans a wide range of climates, your marine aquarium filter setup may need adjustments depending on where you live:
- Northern and Midwest states: Winter heating in the home can dry out the air and increase evaporation; a reliable heater and auto top-off (ATO) system are essential to prevent salinity swings during colder months
- Southern and Southwest states: Summer ambient room temperatures can push tank temperatures above the ideal 76–80°F range; a chiller or additional fans over the sump may be necessary to prevent overheating, especially for reef tanks
- Coastal states with humid summers: Higher ambient humidity can slow evaporation but also promotes salt creep around equipment; wipe down electrical connections more frequently
7. Marine Fish Tank Full Setup Checklist
Use this complete marine fish tank full setup checklist to make sure nothing is missed before adding livestock.
Pre-Setup Planning
- Choose tank size based on available space and desired livestock (bigger tanks are more forgiving for beginners)
- Research compatible fish and invertebrates before purchase
- Decide fish-only vs. reef setup, since this determines lighting and filtration needs
Equipment Checklist
- Display tank and sturdy stand rated for full water weight (roughly 10 lbs per gallon)
- Filtration system (sump, canister, or AIO)
- Protein skimmer (strongly recommended even for fish-only tanks)
- Heater and backup thermometer
- Powerheads for additional water flow
- Lighting appropriate to livestock (basic LED for fish-only, high-PAR reef LED for corals)
- Refractometer for accurate salinity testing
- Master test kit (ammonia, nitrite, nitrate, pH, alkalinity, calcium, magnesium)
- Live rock and live or dry sand
- Saltwater mix (synthetic sea salt)
- Auto top-off (ATO) system to combat evaporation
Setup Sequence Checklist
- Position tank and stand on a level, weight-appropriate surface
- Plumb and test filtration equipment with fresh water
- Add sand and aquascape live rock
- Mix and add saltwater, confirming salinity with a refractometer
- Install heater, powerheads, and lighting
- Begin the nitrogen cycle before adding any livestock
- Test water parameters daily during cycling
- Add fish and invertebrates gradually over several weeks
Post-Setup Maintenance Checklist
- Weekly 10–15% water changes
- Test key parameters twice weekly during the first 3 months
- Clean mechanical filtration media every 2–4 days
- Replace chemical media on schedule
- Monitor for algae, cyanobacteria, or coral stress as early warning signs
8. Common Filtration Mistakes Beginners Make
Adding Livestock Before Cycling Completes
The single most common cause of early fish loss is impatience. Skipping or rushing the 4–6 week cycling period exposes fish to toxic ammonia and nitrite spikes.
Underestimating Bioload
A tank stocked too heavily for its filtration capacity will consistently show elevated nitrates, algae blooms, and stressed livestock — even with a technically “adequate” filter running.
Neglecting Mechanical Media Maintenance
Letting filter socks or floss sit for a week or more turns your mechanical stage into a nitrate factory as trapped debris decomposes in place.
Running Only One Filtration Type
Relying solely on a canister filter’s cartridges without dedicated biological media capacity often leads to unstable parameters once bioload increases.
Ignoring Flow Rate Requirements
Marine tanks need significantly higher turnover than freshwater a common rule of thumb is 5–10x total volume per hour. Undersized pumps create dead spots where waste accumulates and oxygen levels drop.
Overcleaning Biological Media
In an effort to keep things spotless, some beginners scrub or replace biological media entirely during routine maintenance. This destroys the bacteria colony you spent weeks cultivating and can trigger a mini ammonia spike. Biological media should only ever be rinsed gently in removed tank water, never tap water (which contains chlorine/chloramine that kills bacteria) and never replaced wholesale.
Mixing Incompatible Filtration Components
Combining a high-powered canister filter rated for a much larger tank with a small display can create excessive turbulence that stresses fish and corals, while pairing an undersized HOB filter with a heavily stocked reef tank leaves biological capacity dangerously thin. Always cross-check your filter’s rated capacity against your actual tank volume and stocking plan, not just the tank size printed on the box.
Forgetting to Account for Salt Creep and Evaporation
Evaporation in marine tanks concentrates salinity over time since only fresh water evaporates, not salt. Beginners who top off with saltwater instead of fresh water gradually push salinity dangerously high, stressing both fish and the bacteria colonies your filtration depends on. Always top off evaporated water with fresh RO/DI water, and consider an auto top-off (ATO) system to automate this and protect your filtration’s bacterial stability.
9. Do You Need a Marine Aquarium Filter Setup PDF?
Many beginners search for a marine aquarium filter setup pdf hoping for a printable, offline reference they can keep next to the tank during setup. Here’s the honest answer: a PDF isn’t strictly necessary, but it can be genuinely useful in specific situations.
When a PDF Guide Helps
- You want a printable checklist to follow step-by-step without needing a screen near water
- You’re teaching a class, fish club workshop, or helping a friend set up their first tank
- You prefer annotating and highlighting a physical or downloadable reference
When You Don’t Need One
- This guide (and reputable hobbyist forums/wikis) covers the same information in a more up-to-date, searchable format
- Filtration technology and best practices evolve — a PDF downloaded years ago may recommend outdated media or turnover rates
- Most modern aquarium retailers and manufacturers include setup instructions directly with purchased equipment
If you do want a printable version, look for PDFs published or updated within the last 1–2 years from reputable sources like university extension aquaculture programs, established reef-keeping organizations, or equipment manufacturers — and always cross-check cycling timelines and parameter targets against current testing kit standards, since recommended ranges have been refined over the past decade.
FAQ:
How long does a marine aquarium filter setup take to cycle?
Most systems take 4–6 weeks to fully cycle. Ammonia rises and falls first, followed by nitrite, then nitrate appears as beneficial bacteria establish. Testing daily during this period confirms when it’s safe to add livestock.
What is the best marine aquarium filter setup for beginners?
An all-in-one (AIO) tank with a built-in rear filtration chamber is generally best for beginners. It combines mechanical, biological, and chemical filtration in one compact system without requiring drilling or complex plumbing knowledge.
Can I use a freshwater filter for a saltwater tank?
Technically yes, but it’s not recommended. Freshwater filters usually lack the flow capacity, biological media volume, and skimmer compatibility marine tanks need to handle higher bioloads and sensitive livestock.
Do I need a protein skimmer for a fish-only marine tank?
It’s strongly recommended, even without corals. Protein skimmers remove dissolved organics before they break down into ammonia, significantly reducing bioload on your biological filtration and improving long-term water stability.
How much does a full saltwater aquarium setup cost?
A basic nano fish-only setup costs $235–$550, while a mid-size reef tank runs $940–$2,030, and advanced large systems can exceed $6,000. Costs vary based on tank size, equipment quality, and whether you include coral-specific lighting.
Is a DIY marine aquarium filter setup reliable long-term?
Yes, when built correctly with proper media and flow rates. DIY sumps and modified HOB filters can match commercial performance for a fraction of the cost, though beginners with reef tanks should still buy a commercial protein skimmer for consistency.
How often should I clean marine aquarium filter media?
Mechanical media (filter floss/socks) should be rinsed or replaced every 2–4 days. Chemical media like carbon needs replacing every 2–4 weeks. Biological media should never be fully replaced or deep-cleaned, only rinsed in tank water to preserve bacteria.
What size filter do I need for my marine fish tank full setup?
Match filter capacity to at least 5–10x your total tank volume per hour in turnover rate. For a 50-gallon tank, that means selecting equipment rated for roughly 250–500 gallons per hour of total system flow.
Conclusion
A successful marine aquarium filter setup comes down to three fundamentals: layering mechanical, biological, and chemical filtration correctly; matching your equipment choice (sump, canister, HOB, or AIO) to your tank size and goals; and respecting the 4–6 week cycling process before adding livestock.
Key takeaways:
- Filtration isn’t optional or one-size-fits-all your setup must match your bioload and livestock type, whether you’re building a nano fish-only tank or a full reef system.
- Budget realistically using the saltwater aquarium setup cost breakdowns above, and don’t overlook ongoing maintenance expenses.
- Whether you go commercial or build a DIY marine aquarium filter setup, patience during cycling matters more than the price tag of your equipment.
Ready to start your own saltwater aquarium for beginners journey? Bookmark this guide as your go-to reference, run through the full setup checklist step by step, and test your water parameters before adding a single fish. Your future reef will thank you.
