
Have you ever scrolled past a photo of a lush, green underwater garden and wondered how anyone keeps it alive without an aquarium science degree? You are not alone. Learning how to setup a planted fish tank is one of the most rewarding projects in the hobby, but most beginners make the same handful of mistakes with substrate, lighting, and plant selection long before their first fish ever goes in. The good news is that a thriving planted aquarium for beginners does not require expensive CO2 systems, exotic equipment, or years of experience.
In this guide you’ll learn exactly how to setup a planted fish tank step by step, from choosing the right planted aquarium substrate layers to picking beginner-proof plants, cycling your water safely, and avoiding the algae outbreaks that sink most first attempts. Whether you want a simple low-tech bowl or a full freshwater aquarium with a CO2 system down the road, this walkthrough covers every stage in plain, practical language.
1. What Is a Planted Fish Tank (and Why Beginners Love Them)
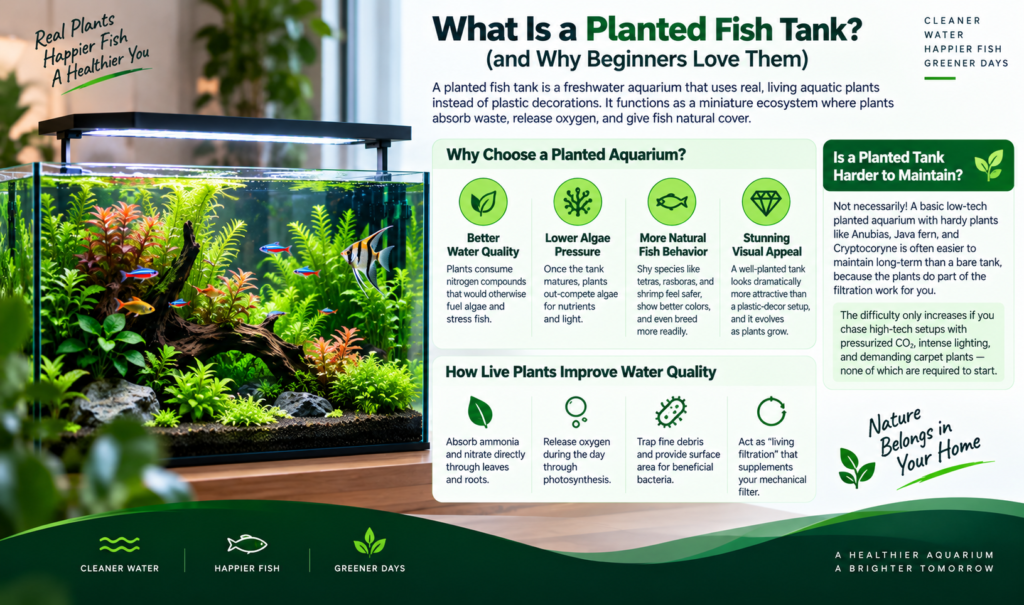
A planted fish tank, also called a planted aquarium or live plant aquarium, is a freshwater setup that uses real, living aquatic plants instead of plastic decorations. Unlike a bare tank with a few artificial props, a planted aquarium functions as a miniature ecosystem: plants absorb ammonia and nitrate produced by fish waste, release oxygen during the day, and give fish natural cover that reduces stress and aggression.
Why Choose a Planted Aquarium Over a Bare Tank
- Better water quality: live plants consume nitrogen compounds that would otherwise fuel algae and stress fish.
- Lower long-term algae pressure once the tank matures, because plants out-compete algae for nutrients and light.
- More natural fish behavior: shy species like tetras, rasboras, and shrimp color up and breed more readily with plant cover.
- Visual payoff: a well-planted tank looks dramatically more attractive than a plastic-decor setup, and it changes over time as plants grow.
How Live Plants Actually Improve Water Quality
Beyond general “filtration,” live plants perform specific, measurable jobs in the tank. They take up ammonium directly through their leaves and roots, competing with nitrifying bacteria for the same nitrogen source and reducing the ammonia spikes that stress fish. During daylight hours, photosynthesis raises dissolved oxygen levels, which supports higher fish stocking and more stable pH than a plant-free tank of the same size. Dense plant growth also physically traps fine debris and provides surface area for beneficial bacteria to colonize, functioning as a form of “living filtration” that supplements though never fully replaces your mechanical filter.
Is a Planted Tank Harder to Maintain Than a Regular Aquarium?
This is the most common misconception that stops people from trying. A basic low-tech planted aquarium for beginners, stocked with hardy species like Anubias, Java fern, and Cryptocoryne, is often easier to maintain long-term than a bare tank, because the plants do part of the filtration work for you. The difficulty curve only rises if you chase high-tech setups with pressurized CO2, intense lighting, and demanding carpet plants none of which are required to start.
What You Can Realistically Expect in the First 90 Days
Most new planted tanks go through a predictable arc: a clear-water “honeymoon” period in week one, a mild algae bump around weeks two to five while the tank finds its nutrient balance, and a stabilizing phase from week six onward as plants take root and begin actively growing. Knowing this pattern in advance prevents the panic-buying of chemicals that often makes early algae worse instead of better.
Planted Tank vs. Traditional Aquarium: A Side-by-Side Look
| Feature | Planted Aquarium | Traditional (Bare/Decor) Tank |
|---|---|---|
| Water quality buffering | Plants absorb nitrate and some ammonia | Relies entirely on filter and water changes |
| Visual maturity | Improves over months as plants grow in | Static — looks the same on day 1 and day 500 |
| Fish stress levels | Lower, thanks to natural cover | Higher in exposed, open-water layouts |
| Upfront cost | Slightly higher (plants, substrate, light) | Lower initial cost with plastic decor |
| Long-term algae control | Plants compete with algae for nutrients | Algae has no natural competition |
2. Popular Aquascaping Styles for a Beginner Planted Aquarium
Before buying plants, it helps to know roughly what look you’re going for, since different aquascaping styles call for different plant shapes, hardscape, and layout logic. You don’t need to master any of these formally, but borrowing their basic rules makes a first planted aquarium for beginners look intentional rather than cluttered.
Nature Style (Easiest for First-Timers)
Inspired by natural riverbeds and forests, the Nature style mixes driftwood, rounded stones, and a variety of plant heights in an asymmetrical, organic layout. It is the most forgiving style because imperfections read as “natural” rather than as mistakes, making it the most common recommendation for a first live plant aquarium.
Dutch Style (Plant-Forward, No Hardscape Required)
The Dutch style skips driftwood and rock almost entirely, instead arranging dense rows (“streets”) of different stem plants by color, leaf shape, and height, tallest at the back. It requires more frequent trimming than other styles but is an excellent way to learn a wide variety of stem plant care in one tank.
Iwagumi Style (Minimalist, Best Attempted After Tank #1)
Iwagumi uses a small number of carefully placed stones as the entire visual structure, carpeted with a single low-growing foreground plant like dwarf hairgrass or Monte Carlo. It looks striking but is genuinely harder for beginners, since carpeting plants are pickier about light and CO2 than the hardy species recommended earlier in this guide.
Jungle Style (Lowest Maintenance, Most Forgiving)
A jungle-style tank lets plants grow densely and somewhat wild, prioritizing coverage and fish habitat over precise trimming. This pairs naturally with the low-tech, no-CO2 approach in Section 5 and is often the best starting point for anyone who wants a thriving live plant aquarium without a strict maintenance schedule.
3. How to Set Up a Planted Fish Tank Step by Step: The Complete Walkthrough
This section is the core of the guide: a full, ordered process for how to setup a planted fish tank step by step, from empty box to finished aquascape. Follow the steps in order skipping ahead (especially adding fish too early) is the single biggest cause of failed first tanks.
Step 1: Choose the Right Tank Size and Location
For anyone learning how to set up a freshwater aquarium for the first time, bigger is genuinely easier. A 20–29 gallon tank holds water parameters far more stably than anything under 10 gallons, giving you more room for error while you learn. Place the tank away from direct sunlight (which triggers algae blooms), away from heating/cooling vents, and on a stand rated for the tank’s full water weight — roughly 8.3 lbs per gallon.
Step 2: Gather Your Equipment
Before adding a single plant, assemble the core equipment list below.
| Equipment | Purpose | Beginner Recommendation |
|---|---|---|
| Aquarium + stand | Holds water weight safely | 20–29 gal rectangular tank |
| Substrate | Anchors plant roots, feeds roots | Nutrient-rich aquasoil or capped gravel |
| Filter | Biological + mechanical filtration | Sponge or hang-on-back (HOB) filter |
| Heater | Stable tropical temperature | Adjustable heater, ~1–3 watts per gallon |
| Lighting | Powers photosynthesis | Full-spectrum LED, 6500–7000K |
| Water conditioner | Neutralizes chlorine/chloramine | Any dechlorinator (e.g., Seachem Prime) |
| Test kit | Tracks ammonia, nitrite, nitrate, pH | Liquid-reagent master test kit |
| Plants | Natural filtration + aesthetics | Anubias, Java fern, Cryptocoryne, Amazon sword |
Step 3: Add and Rinse the Substrate
Rinse inert substrates like gravel or sand thoroughly until the runoff water is clear; nutrient-rich aquasoils should not be rinsed, since that washes away the nutrients they are designed to release. Slope the substrate slightly higher at the back of the tank for visual depth and better drainage toward the front glass.
Step 4: Hardscape, Fill, and Plant
Arrange any driftwood or rock before adding water, since dry positioning is far easier to judge than positioning underwater. Fill the tank slowly over a plate or plastic bag to avoid disturbing the substrate, then plant your live plants (full technique covered in Section 4). Add your filter and heater but leave them off until the water is in place.
Step 5: Cycle the Tank Before Adding Fish
Run the filter, heater, and lights for at least 2–4 weeks before introducing any fish. This establishes the beneficial bacteria colony that converts toxic ammonia into nitrite and then into safer nitrate — a process explained fully in Section 7. Test the water every few days during this period rather than guessing.
| Beginner Tip
Resist the urge to add fish on day one. A cycled tank with established plant growth is dramatically more forgiving than a freshly filled one, and it is the single biggest factor separating successful first-time aquarists from frustrated ones. |
4. Planted Aquarium Substrate Layers Explained
Substrate is the foundation of every planted tank, and understanding planted aquarium substrate layers is essential whether you are building a simple gravel tank or a layered aquasoil system. The right substrate anchors roots, buffers water chemistry, and feeds plants for months without extra fertilizer.
The Three-Layer Substrate System
| Layer | Material Examples | Function |
|---|---|---|
| Base (bottom) layer | Root tabs, laterite, or nutrient soil | Long-term nutrient reserve for root-feeding plants |
| Middle layer | Aquasoil or fine gravel | Bulk depth, holds the base layer down, roots anchor here |
| Cap (top) layer | Sand or fine gravel (1–2mm) | Prevents nutrient cloudiness, neat finished look |
Inert Substrate vs. Nutrient-Rich Aquasoil
Inert substrates like plain gravel or sand add no nutrients on their own, which means you will rely more heavily on root tabs and liquid fertilizer, but they are cheaper, don’t affect pH, and are more forgiving for beginners. Nutrient-rich aquasoil (such as ADA Aqua Soil or Fluval Stratum) actively feeds plants and often softens water slightly, which benefits many popular aquarium plants, but it is more expensive and can cause a temporary ammonia spike in the first two weeks.
How Deep Should Planted Aquarium Substrate Layers Be?
- Front of tank (foreground plants): 1.5–2 inches
- Back of tank (background/root-feeding plants): 3–4 inches
- Sloped design improves both drainage and the visual sense of depth in the aquascape
Do You Need Root Tabs If You Use Aquasoil?
Aquasoil provides strong nutrition for the first 6–12 months, but heavy root feeders like Amazon swords and Cryptocoryne benefit from a root tab pushed near their root zone every 2–3 months regardless of substrate type. This keeps larger plants from outgrowing the soil’s original nutrient supply.
5. How to Plant Aquarium Plants in Gravel the Right Way
Many beginners specifically want to know how to plant aquarium plants in gravel, since gravel is the most widely available and least intimidating substrate. The technique differs slightly depending on whether a plant is a rhizome plant, a stem plant, or a rooted crypt/sword.
Planting Rhizome Plants (Anubias, Java Fern, Bucephalandra)
Never bury the rhizome the thick horizontal stem the leaves grow from under gravel, or it will rot within weeks. Instead, tie or glue the rhizome to driftwood or rock using cotton thread or cyanoacrylate gel glue, letting only the thin root hairs make contact with the gravel below.
Planting Stem Plants (Rotala, Ludwigia, Cabomba)
- Trim off the bottom inch of leaves so the lower stem is bare.
- Push the bare stem 1–1.5 inches into the gravel using tweezers, angled slightly rather than straight down.
- Space stems 1 inch apart in small clusters of 3–5 for a fuller look sooner.
Planting Rooted Plants (Amazon Sword, Cryptocoryne, Vallisneria)
Trim any long or damaged roots to about 2 inches, then dig a small hole in the gravel with your fingers or tweezers, spread the roots out, and cover them so that the crown (where roots meet leaves) sits just above the gravel surface. Burying the crown itself causes the plant to rot.
Long-Handled Tweezers: The One Tool Worth Buying
A pair of long aquascaping tweezers costs under $15 and makes planting in gravel dramatically easier, especially in tanks deeper than 12 inches. They let you place stems precisely without disturbing the surrounding substrate or your own arm getting wet to the shoulder.
Floating Plants: The Easiest Entry Point of All
If gravel planting still feels intimidating, floating plants like Amazon frogbit or duckweed require no substrate contact whatsoever — simply place them on the water’s surface. They pull nutrients directly from the water column, shade out algae-feeding light, and give shy fish overhead cover, making them one of the fastest ways to see visible plant growth in a brand-new tank.
6. How to Set Up a Planted Aquarium Without CO2 (Low-Tech Method)
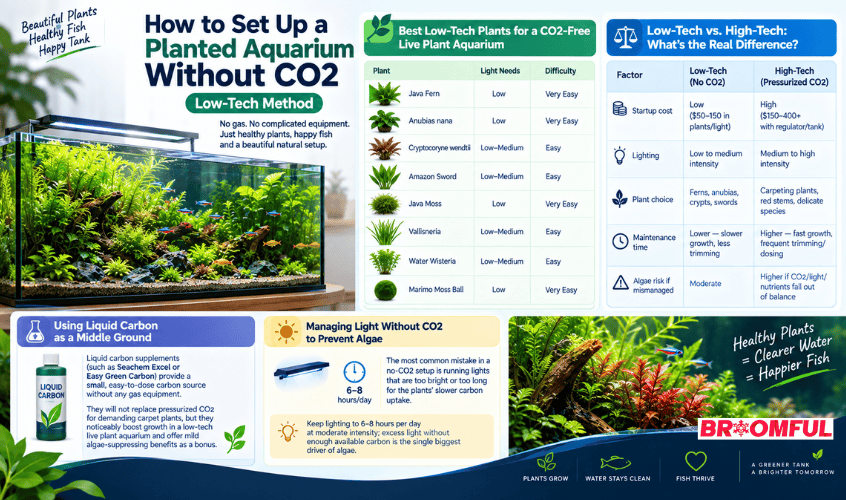
You do not need pressurized gas equipment to grow a beautiful tank. Learning how to setup a planted aquarium without CO2 opens the hobby to anyone on a budget, and many of the most popular plants in the trade are chosen specifically because they thrive in low-tech, no-CO2 conditions.
Best Low-Tech Plants for a CO2-Free Live Plant Aquarium
| Plant | Light Needs | Difficulty |
|---|---|---|
| Java Fern | Low | Very Easy |
| Anubias nana | Low | Very Easy |
| Cryptocoryne wendtii | Low–Medium | Easy |
| Amazon Sword | Low–Medium | Easy |
| Java Moss | Low | Very Easy |
| Vallisneria | Low–Medium | Easy |
| Water Wisteria | Low–Medium | Easy |
| Marimo Moss Ball | Low | Very Easy |
Low-Tech vs. High-Tech: What’s the Real Difference?
| Factor | Low-Tech (No CO2) | High-Tech (Pressurized CO2) |
|---|---|---|
| Startup cost | Low ($50–150 in plants/light) | High ($150–400+ with regulator/tank) |
| Lighting | Low to medium intensity | Medium to high intensity |
| Plant choice | Ferns, anubias, crypts, swords | Carpeting plants, red stems, delicate species |
| Maintenance time | Lower — slower growth, less trimming | Higher — fast growth, frequent trimming/dosing |
| Algae risk if mismanaged | Moderate | Higher if CO2/light/nutrients fall out of balance |
Using Liquid Carbon as a Middle Ground
Liquid carbon supplements (such as Seachem Excel or Easy Green Carbon) provide a small, easy-to-dose carbon source without any gas equipment. They will not replace pressurized CO2 for demanding carpet plants, but they noticeably boost growth in a low-tech live plant aquarium and offer mild algae-suppressing benefits as a bonus.
Managing Light Without CO2 to Prevent Algae
The most common mistake in a no-CO2 setup is running lights that are too bright or too long for the plants’ slower carbon uptake. Keep lighting to 6–8 hours per day at moderate intensity; excess light without enough available carbon is the single biggest driver of algae in low-tech tanks.
7. Lighting, Fertilizing & CO2 Basics for a Live Plant Aquarium
Even a simple live plant aquarium for beginners depends on three inputs staying in rough balance: light, nutrients, and carbon. Understanding how these interact prevents the majority of algae and slow-growth problems reported by new planted tank keepers.
Choosing the Right Light Spectrum and Duration
- Look for full-spectrum LED fixtures in the 6500K–7000K range, which mimics natural daylight and supports photosynthesis efficiently.
- Start with 6 hours per day and increase gradually to 8 hours if plants show healthy, non-algae growth.
- Use a timer so lighting stays consistent irregular light cycles confuse plants and encourage algae.
Fertilizing: Root Tabs vs. Liquid Fertilizer
Root tabs feed heavy root-feeders like swords and crypts directly at the substrate level, while liquid fertilizers (often called “all-in-one” ferts) supply nutrients through the water column for stem plants and floating plants that draw nutrition through their leaves. Most planted tanks benefit from using both: root tabs every 2–3 months plus a weekly dose of liquid fertilizer.
Understanding the Light–Nutrient–Carbon Triangle
Think of light, nutrients, and carbon (CO2) as three points of a triangle that must stay roughly proportional. Ramping up any single point most often light, since it’s the easiest to increase with a new fixture — without raising the other two simply hands algae a competitive advantage, because algae exploits the imbalance faster than rooted plants can. This single concept explains the majority of the algae complaints beginners post in online aquarium forums, and keeping it in mind prevents most of the trial-and-error frustration that turns people off the hobby.
Do You Need a CO2 System to Succeed?
No. CO2 accelerates growth and unlocks certain demanding plant species, but thousands of thriving planted tanks run entirely on ambient CO2 from the atmosphere and fish respiration. If you are still learning how to setup a planted fish tank for beginners, master the low-tech basics first and consider CO2 only after your tank has been stable for several months.
Reading Plant Health Signals
| Symptom | Likely Cause | Fix |
|---|---|---|
| Yellowing new leaves | Iron or micronutrient deficiency | Add a comprehensive liquid fertilizer |
| Holes in older leaves | Potassium deficiency | Dose a potassium supplement |
| Leggy, stretched stems | Insufficient light | Increase intensity or move plant higher |
| Brown/green dust on leaves | Algae from light/nutrient imbalance | Reduce photoperiod, increase water changes |
8. How to Set Up a Freshwater Aquarium: Cycling, Water Parameters & Fish
Plants are only half the equation. Knowing how to set up a freshwater aquarium properly means understanding the nitrogen cycle, target water parameters, and how to choose fish that pair well with a planted setup.
Understanding the Nitrogen Cycle
- Fish waste and uneaten food break down into toxic ammonia (NH3).
- Beneficial bacteria (Nitrosomonas) convert ammonia into nitrite (NO2), which is also toxic to fish.
- A second bacteria group (Nitrobacter) converts nitrite into nitrate (NO3), which is far less toxic and is removed through water changes and absorbed by plants.
Fishless Cycling vs. Fish-In Cycling
Fishless cycling — dosing pure ammonia and waiting for bacteria to process it before adding any fish — is the more humane and more forgiving method, typically taking 4–6 weeks. Fish-in cycling, where a small number of hardy fish are added immediately with heavy monitoring and water changes, is faster to “see progress” but risks real harm to the fish if ammonia spikes are missed.
Target Water Parameters for a Community Planted Tank
| Parameter | Ideal Range | Testing Frequency |
|---|---|---|
| Ammonia (NH3/NH4) | 0 ppm | Daily during cycling, weekly after |
| Nitrite (NO2) | 0 ppm | Daily during cycling, weekly after |
| Nitrate (NO3) | 5–30 ppm | Weekly |
| pH | 6.5–7.5 (species dependent) | Weekly |
| Temperature | 74–80°F (23–27°C) | Continuous via heater thermostat |
| GH (general hardness) | 4–8 dGH for most community fish | Monthly or when plants struggle |
Choosing Fish That Thrive in a Planted Tank
Small, peaceful species do best in planted setups because they use plant cover for security without uprooting delicate stems. Strong beginner choices include neon tetras, cardinal tetras, harlequin rasboras, cherry shrimp, and nerite snails (excellent natural algae control). Avoid large cichlids or goldfish in a heavily planted tank, since both species dig substrate and eat soft-leaved plants.
The Stocking Rule of Thumb for New Tanks
A commonly used starting guideline is roughly one inch of adult fish length per gallon of water for small, peaceful community species — though this is a rough planning tool, not a strict formula, since bioload also depends on filtration strength and how heavily the tank is planted. Add fish in small groups spaced a week or two apart rather than stocking the entire tank at once, giving your bacteria colony time to catch up with each new addition.
Acclimating Fish to a Newly Planted Tank
Float the sealed fish bag in the tank for 15–20 minutes to match temperature, then use the drip-acclimation method — running a thin airline from the tank into the bag or a container over 20–30 minutes to slowly match pH and hardness before releasing fish into the aquarium. Rushing acclimation is a common cause of new-fish deaths that has nothing to do with the tank’s plants or cycling status.
Adding Shrimp and Snails to a Live Plant Aquarium
Cherry shrimp and nerite snails are especially well-suited to a planted tank because they graze on biofilm and soft algae without damaging healthy plant tissue, effectively acting as a free cleanup crew. Shrimp are notably more sensitive to copper-based medications and sudden parameter swings than most fish, so introduce them only after the tank has been fully cycled and stable for at least two weeks.
9. Common Planted Tank Mistakes Beginners Make (and How to Avoid Them)
Mistake #1: Adding Fish Before the Tank Is Cycled
This causes ammonia and nitrite spikes that stress or kill fish. Always complete a fishless cycle (Section 7) before stocking.
Mistake #2: Too Much Light, Too Soon
New plants have not yet developed the root systems or biomass to use all the light and nutrients a bright fixture provides, so excess light almost always feeds algae instead of plants. Start conservative and increase gradually.
Mistake #3: Overcrowding Fish or Plants Immediately
Cramming a tank with fish and dense planting on day one overwhelms an immature filter and bacteria colony. Stock gradually over several weeks and let plant mass build up naturally.
Mistake #4: Ignoring Water Changes Because “Plants Handle It”
Plants reduce nitrate but do not eliminate the need for water changes, which also replenish trace minerals and remove dissolved organics. A weekly 20–30% water change remains standard even in a heavily planted tank.
Mistake #5: Choosing Plants Based on Looks Alone
A plant that looks stunning in a store photo may need intense lighting, injected CO2, and near-perfect water stability conditions a brand-new tank simply cannot offer yet. Cross-check any plant against a difficulty rating before buying, and favor the beginner-proof species listed in Sections 1 and 6 for at least your first six months.
Mistake #6: Skipping Substrate Prep
Dumping unrinsed inert gravel straight into the tank causes days of persistent cloudiness and can trap dust that clogs a new filter. Take the extra 15 minutes to rinse properly, and always double-check whether your chosen substrate is meant to be rinsed or left untouched (see Section 4).
10. Weekly Maintenance Schedule & Troubleshooting Guide
A consistent, low-effort routine keeps a planted aquarium for beginners healthy without turning into a part-time job.
| Task | Frequency | Why It Matters |
|---|---|---|
| Water change (20–30%) | Weekly | Removes excess nutrients and organics, replenishes minerals |
| Test ammonia/nitrite/nitrate | Weekly (daily first month) | Catches problems before fish are affected |
| Trim fast-growing stem plants | Weekly to biweekly | Prevents shading of lower plants and encourages fuller growth |
| Clean filter media in tank water | Every 2–4 weeks | Preserves beneficial bacteria while removing debris |
| Dose root tabs | Every 2–3 months | Replenishes nutrients for heavy root feeders |
| Check/replace light bulb or LED | Every 12–18 months | Fading light output slows plant growth over time |
Quick Troubleshooting Reference
- Cloudy white water: usually a bacterial bloom during cycling — normal, clears within days.
- Green water: free-floating algae from excess light/nutrients — reduce photoperiod, consider a UV sterilizer.
- Black beard algae on plant edges: often linked to unstable CO2/flow — improve circulation and trim affected leaves.
- Plants melting after replanting: normal transition stress for some species (Vallisneria, Cryptocoryne) — new growth typically follows within 2–3 weeks.
Signs Your Planted Aquarium Is Thriving
It helps to know what success actually looks like, since beginners often assume something is wrong when a tank is simply maturing normally. Look for these positive signals rather than fixating only on problems.
- New leaf growth on stem plants every 1–2 weeks, with leaves noticeably larger or more colorful than when planted.
- Visible root spread on rooted plants when gently checked during maintenance, indicating the substrate is feeding them well.
- Fish displaying natural color and relaxed behavior, spending time exploring plant cover rather than hiding constantly.
- Nitrate readings trending gradually downward between water changes as plant mass increases and consumes more nitrogen.
- Minimal to no algae film on the glass between weekly cleanings, a sign the light/nutrient/carbon balance discussed in Section 7 has settled.
11. Real Beginner Budget Breakdown: What Does It Actually Cost?
One question competitor guides rarely answer with real numbers is cost. Below is a realistic starting budget for a 20-gallon low-tech planted aquarium for beginners, using mid-range equipment rather than the cheapest or most premium options on the market.
| Item | Budget Option | Mid-Range Option |
|---|---|---|
| 20-gallon tank + stand | $90 | $180 |
| Substrate (aquasoil, ~9 lbs) | $20 | $35 |
| Filter (sponge or HOB) | $15 | $35 |
| Heater | $15 | $25 |
| LED light fixture | $25 | $60 |
| Live plants (6–8 stems/pots) | $25 | $50 |
| Test kit + water conditioner | $20 | $25 |
| Approximate Total | $210 | $410 |
Fish, shrimp, and any optional extras like root tabs, liquid fertilizer, or a CO2 kit sit on top of this baseline. Because a low-tech, no-CO2 approach skips the $100–250 typically spent on a pressurized CO2 system, it remains the most budget-friendly way for anyone still learning how to setup a planted fish tank for beginners to get started without overspending on their first attempt.
Where It’s Worth Spending More
- Lighting: a higher-quality full-spectrum LED pays off in plant health and lower long-term algae issues.
- Heater: a reliable, accurate heater protects fish health far more than any decorative item.
Where Beginners Can Safely Save Money
- Hardscape (driftwood/rocks): sourced affordably from reputable pet stores rather than premium “designer” pieces.
- Starter plants: begin with a handful of hardy species and propagate more over time via trimming and replanting.
Ongoing Monthly Costs to Budget For
After the initial setup, ongoing costs are modest: expect roughly $10–20 per month for liquid fertilizer, occasional root tabs, water conditioner, and filter media replacement in an average low-tech planted tank. Electricity for the light and heater typically adds only a few dollars monthly for a tank in this size range, making a planted aquarium for beginners inexpensive to run once it’s established, especially compared to the higher electricity and CO2 refill costs of a high-tech setup.
Frequently Asked Questions:
How long does it take to set up a planted fish tank?
Physical setup takes 2–4 hours, but the tank needs 4–6 weeks of cycling before fish are safely added. Budget about a month from empty box to a fully stocked, stable planted aquarium.
What is the easiest live plant for a beginner aquarium?
Java fern and Anubias nana are widely considered the easiest options. Both tolerate low light, don’t need CO2 or root planting, and simply attach to driftwood or rock with thread or glue.
Can I use regular gravel for a planted tank?
Yes. Plain gravel works well for rhizome and rooted plants, though it holds fewer nutrients than aquasoil, so pair it with root tabs and liquid fertilizer for the best growth.
Do planted tanks need a CO2 system to grow well?
No. A wide range of hardy plants ferns, anubias, crypts, and swords thrive in low-tech, no-CO2 setups. CO2 mainly benefits fast-growing carpet and red stem plants.
How often should I do water changes in a planted aquarium?
A weekly 20–30% water change is standard, even in heavily planted tanks, since plants reduce but don’t eliminate the need to remove excess nutrients and replenish minerals.
Why is my new planted tank getting algae?
Algae almost always signals an imbalance between light, nutrients, and carbon most often too much light too early. Cut the photoperiod to 6 hours and reassess after a week.
What fish are safe to add to a planted tank first?
Hardy, peaceful species like neon tetras, harlequin rasboras, and cherry shrimp are ideal first additions after the tank is fully cycled and has established plant growth.
How deep should substrate be for planting?
Aim for 1.5–2 inches at the front and 3–4 inches at the back, giving root-feeding plants enough depth while keeping foreground plants low and tidy.
Conclusion
Setting up a thriving planted fish tank comes down to sequencing: prepare the right substrate layers, plant correctly for each plant type, cycle the water fully before adding fish, and keep light, nutrients, and carbon in balance. Three takeaways to remember cycle before you stock, start low-tech before chasing CO2, and choose beginner-proof plants like Java fern, Anubias, and Cryptocoryne to build confidence early.
You now have a complete, step-by-step roadmap for how to setup a planted fish tank, whether you’re building a simple no-CO2 bowl or your first full freshwater aquarium. Start with one tank, follow the sequence in this guide, and resist the urge to rush the cycle your future self (and your fish) will thank you. Ready to begin? Pick your tank size today and start with Step 1 above.
