
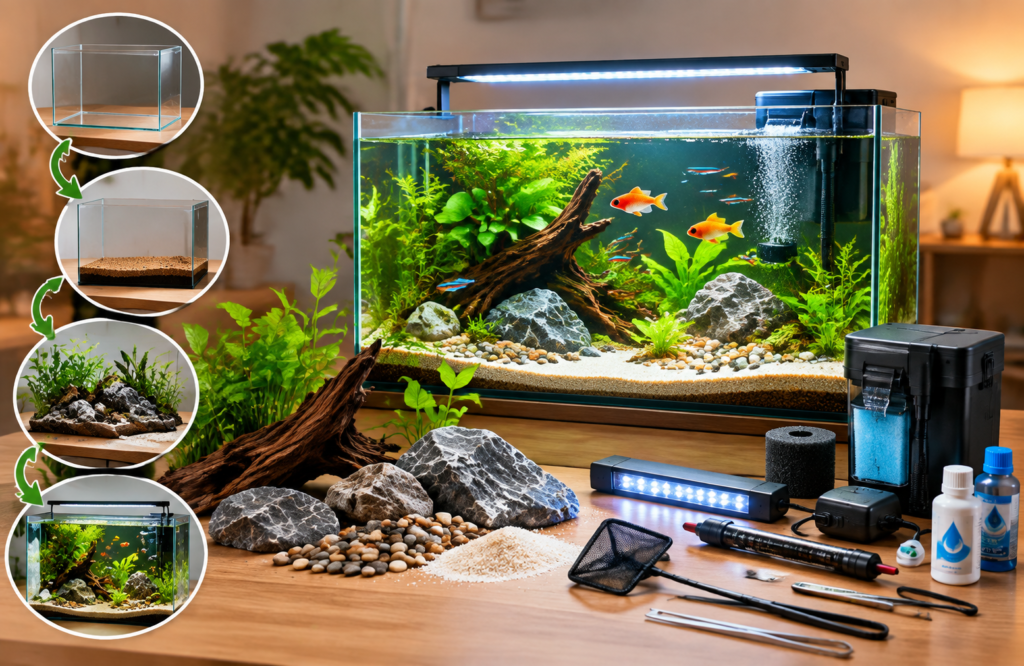
A filled aquarium is much heavier and more technically demanding than it looks: water alone weighs about 8.34 pounds per U.S. gallon. That means even a modest 20-gallon setup holds roughly 167 pounds of water before you add the tank, substrate, rocks, equipment, and stand. A successful homemade fish aquarium therefore needs more than an attractive container. It needs safe materials, level support, reliable filtration, conditioned water, a mature biological filter, and enough space for the fish you plan to keep.
The good news is that a DIY aquarium can still be beginner-friendly when you separate the project into two parts: building or choosing a safe water-holding vessel, then creating a stable aquatic habitat inside it. You can use glass, acrylic, or certain purpose-suitable plastic containers, and you can customize the aquascape without sacrificing animal welfare.
In this guide you’ll learn how to plan and build a homemade aquarium, choose a homemade fish aquarium kit, make a tank without glass, develop practical homemade fish aquarium ideas, design a tank for your home, create a safe school project, cycle the aquarium, choose fish responsibly, estimate costs, and avoid the mistakes that cause leaks or unhealthy water.
What Makes a Homemade Fish Aquarium Safe and Successful?
A DIY aquarium is not simply a transparent box with water. It is a small life-support system. Before choosing decorations or fish, plan around four fundamentals: structural safety, water chemistry, filtration, and the adult needs of the species you want to keep.
Start With the Fish, Not the Container
One of the most common beginner mistakes is buying or building a tank first and deciding what will live in it later. Reverse that process. Research the adult size, social behavior, temperature range, swimming pattern, filtration needs, and minimum practical space for the fish you like. Schooling fish may need a group. Territorial fish may need visual barriers. Strong swimmers usually benefit from a longer footprint. Tropical species generally need stable heat.
Avoid relying on the old “one inch of fish per gallon” shortcut. It does not account for body mass, activity, waste production, territorial behavior, or the difference between a slender tetra and a deep-bodied goldfish. Use species-specific care guidance and size the aquarium generously. Larger water volumes also change temperature and chemistry more slowly, giving beginners more time to correct a problem.
For example, current PetMD guidance says bettas need warm, clean, stable water, filtration, a lid, and at least 2.5 gallons, with 5-10 gallons described as ideal for greater space and stability. That is very different from treating a decorative vase as a complete habitat.
Understand the Weight Before You Build
The U.S. Geological Survey lists fresh water at about 8.34 pounds per gallon. A 10-gallon tank therefore contains about 83 pounds of water; 20 gallons contain about 167 pounds; and 40 gallons contain about 334 pounds. The finished system will weigh more after glass or acrylic, gravel, rocks, wood, filters, and the stand are added.
Place the aquarium on a flat, rigid, level surface designed to support the full load. Do not use a narrow shelf, folding table, damaged dresser, or furniture that flexes. If you are planning a large custom aquarium, wall-integrated aquarium, or unusually tall tank, structural advice from an experienced aquarium builder or qualified professional is more valuable than guessing at material thickness.
A small amount of floor unevenness can also twist a rigid tank. Follow the tank or material manufacturer’s recommendations for foam mats, rim support, or full-bottom support. Never improvise support rules across different tank designs.
Build a Life-Support System, Not Just a Display
Every stocked aquarium produces waste. Fish excrete ammonia, and uneaten food or decaying plant matter adds more. Beneficial nitrifying bacteria convert ammonia to nitrite and then nitrate. Both ammonia and nitrite are dangerous; nitrate is managed through plants, sensible stocking, and regular partial water changes.
This is why filtration and cycling matter. A filter is not only a debris catcher. Its biological media provides surface area for beneficial bacteria. A new aquarium should be established and tested before normal stocking. Current veterinary guidance recommends confirming stable temperature and pH, zero ammonia and nitrite, and low nitrate before considering the biofilter established.
Tap water is usually usable, but it must be treated with a conditioner appropriate for chlorine/chloramine in your local supply. Never wash aquarium media, gravel, or décor with household soap or detergent because residues can harm fish.
Homemade Fish Aquarium Kit: Materials, Tools, and Budget
A practical homemade fish aquarium kit includes more than tank panels. Think in systems: container, support, filtration, temperature control, water testing, maintenance, and safe décor. Buying everything before assembly prevents last-minute substitutions that may be unsafe.
Essential Aquarium Components
For a freshwater beginner build, plan for the following: a watertight aquarium or suitable DIY vessel; a level stand; a lid if the species can jump; a filter sized for the actual tank; a heater for tropical species; a separate thermometer; water conditioner; an ammonia, nitrite, nitrate, and pH test method; substrate if desired; aquarium-safe hardscape; a light; a dedicated bucket; a siphon or gravel vacuum; and fish food matched to the species.
A filter should provide both circulation and biological filtration. Sponge filters are simple and useful for many small or gentle-flow freshwater setups. Hang-on-back filters are convenient. Canister filters can provide higher media capacity for larger systems but add cost and plumbing complexity. Choose equipment based on the livestock and water volume rather than buying the smallest option that technically fits.
For power safety, create drip loops in electrical cords so water cannot run directly toward the outlet. Use outlets and protection appropriate for wet areas under local electrical rules. Keep power strips elevated from the floor and away from splash zones.
Building Materials for Glass or Acrylic Tanks
If you are building the vessel itself, use material intended for aquarium construction and a design with validated dimensions. For a glass build, that typically means properly cut aquarium-appropriate glass, aquarium-safe 100% silicone specified for submerged use, masking tape, plastic scrapers, lint-free cleaning materials, and braces if the design requires them.
For acrylic, use cell-cast acrylic of a thickness appropriate to the aquarium’s height and span, a compatible solvent-cement system, applicator tools, a square work surface, clamps or jigs, and edge-preparation tools. Acrylic construction depends on accurate joints; gaps, rough edges, or the wrong adhesive can create weak seams.
Do not assume the same thickness works for every tank of the same gallon capacity. Hydrostatic pressure increases with water depth, so a tall narrow tank can impose different panel stress than a long shallow one. Use a proven aquarium plan or a professional thickness calculator from a reputable acrylic or aquarium supplier.
Aquarium-Safe vs. Risky Materials
| Material | Good DIY Use | Main Advantage | Main Caution |
| Aquarium glass | Permanent display tank | Scratch resistant, clear, familiar construction | Heavy; edge damage and poor seams can fail |
| Cell-cast acrylic | Custom permanent tank | Light, strong, easy to shape | Scratches more easily; joints require precision |
| Purpose-suitable food-safe plastic tub | Temporary, quarantine, breeding, utility setup | Cheap, light, impact resistant | Can bow; visibility is limited; verify material and structural suitability |
| Polycarbonate | Specialty projects | Very impact resistant | More difficult to bond cleanly; scratches easily |
| Cardboard/foam board | Dry school model only | Cheap and easy to craft | Never a live-fish water container |
| Unknown recycled containers | Generally avoid | Low cost | Unknown residues, coatings, seams, or chemical compatibility |
Never use copper components, rusty metal, pressure-treated wood, painted objects that can flake, or containers that previously held chemicals. If an item is not sold for aquarium use or clearly documented as safe for long-term water contact, research it before putting it in the tank.
What Does a Homemade Setup Cost?
DIY does not always mean cheaper. A small freshwater setup may cost less when you reuse a safe stand, choose a sponge filter, and keep décor simple. But custom-cut acrylic, thick glass, tools, sealants, and failed test pieces can make a from-scratch tank more expensive than a standard retail aquarium.
A realistic U.S. beginner budget often includes the vessel, $20-$60 for basic filtration and aeration, $15-$40 for a heater on a tropical setup, $15-$50 for testing supplies, plus substrate, conditioner, plants, hardscape, and livestock. Prices vary by size and brand, so treat these as planning ranges rather than fixed quotes.
The best way to save money is to spend on reliability first. A sturdy stand, safe container, accurate thermometer, filter, conditioner, and water testing are higher priorities than premium decorative rocks or color-changing lights.
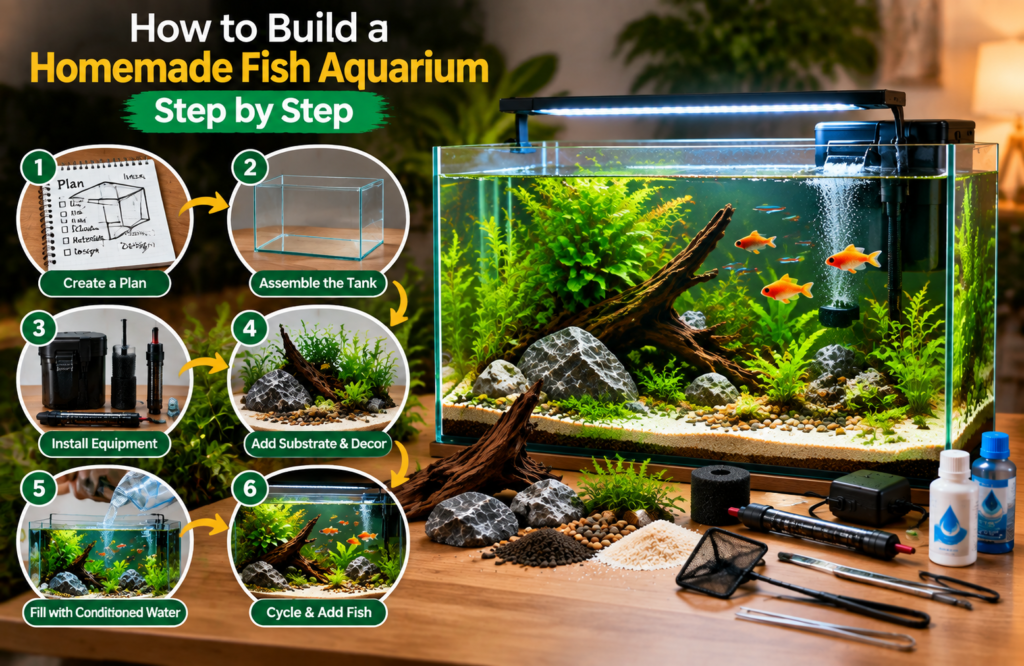
How to Build a Homemade Fish Aquarium Step by Step
There are two ways to interpret “build a homemade aquarium.” The lowest-risk path is to use a manufactured aquarium and DIY the stand, background, aquascape, filtration layout, and décor. The more advanced path is to fabricate the water-holding tank itself. The steps below cover both while keeping fish safety at the center.
Step 1: Create a Written Plan
Write down the intended fish species, adult size, desired tank volume, outer dimensions, material, filtration type, heater requirement, stand size, lid type, and maintenance access. Sketch where cords, hoses, and filter parts will go. A beautiful aquarium that cannot be siphoned, reached, or serviced becomes frustrating quickly.
Use the internal dimensions to estimate actual water volume, then remember that substrate and hardscape displace water. Plan the stand for the total filled weight, not the advertised empty-tank weight. Leave clearance behind the aquarium for a filter, hoses, and drip loops, and above it for feeding and maintenance.
If building the vessel, get the glass or acrylic cut professionally when possible. Straight, square, clean edges reduce assembly problems. Dry-fit every panel before applying silicone or solvent.
Step 2: Assemble the Vessel Carefully
For a glass aquarium, work on a flat protected surface. Clean bonding edges with a residue-free method recommended for the materials. Tape the outer edges to control silicone squeeze-out. Apply a continuous bead of aquarium-safe silicone, join the panels squarely, and tool the interior seams without repeatedly disturbing them.
Silicone curing time depends on the product, bead thickness, humidity, and manufacturer instructions. Do not fill the aquarium simply because the surface feels dry. Follow the sealant label’s full-cure requirement for aquarium or water-immersion use.
For acrylic, the objective is a close, even joint that allows the proper acrylic solvent to wick through the seam. Work with accurate jigs, avoid forcing warped panels into position, and follow the adhesive manufacturer’s cure schedule. Poorly prepared acrylic edges are a common source of bubbles and weak joints.
If you are not confident in panel thickness, bracing, or seam design, use a commercially made aquarium and keep the “homemade” work focused on the aquascape and equipment system. That still gives you a highly customized result without making the tank shell the failure point.
Step 3: Leak-Test Before Decorating
Move the empty tank to a safe test location such as a garage, patio, utility area, or other level surface where a leak will not damage flooring. Fill it gradually. Mark the water level and inspect every seam, corner, bulkhead, and fitting.
Leave the tank filled long enough to reveal slow seepage. A full 24-hour test is a sensible minimum for a small DIY tank after the adhesive has completely cured; larger or complex custom builds are often tested longer. Watch not only for dripping but also for unusual bowing, seam separation, or stand movement.
If a seam leaks, do not smear fresh silicone over a wet, contaminated surface and assume the problem is solved. Drain the aquarium, dry it, and repair the joint properly according to the construction method. Structural seam repairs may require removing and redoing the bond.
Step 4: Build the Habitat and Cycle It
Once the shell passes its leak test, rinse substrate and aquarium-safe décor with plain water. Add the substrate, hardscape, plants, filter, heater, thermometer, and light. Fill slowly with tap water and add an appropriate conditioner.
Start the equipment and confirm that temperature and flow are stable. Then establish the biological filter. A fishless cycle is a humane, controllable approach for a new DIY aquarium: provide a measured ammonia source or an established cycling method, add beneficial bacteria if desired, and test regularly. The goal is a biofilter that can process ammonia and nitrite to zero while nitrate appears and remains manageable.
Cycling is not a fixed number of days. PetMD notes that the process can take roughly four to six weeks in a betta setup, while Aqueon describes freshwater cycling as commonly taking several weeks and sometimes longer. Use test results, not the calendar, to decide when the tank is ready.
How to Make Fish Tank at Home Without Glass
Back to Table of Contents
If you are researching How to make fish tank at home without glass, the best alternatives are usually acrylic or a purpose-suitable plastic container. A non-glass aquarium can be lighter and more impact resistant, but the material still has to handle constant water pressure without bowing, cracking, leaching, or failing at the seams.
Option 1: Build an Acrylic Aquarium
Acrylic is the closest substitute for glass in a permanent display tank. It is clear, relatively lightweight, and can be cut into custom shapes. Because the panels are chemically bonded rather than simply “glued” in the everyday sense, accurate edge preparation and fit are essential.
A basic workflow is: choose a validated design, order cell-cast acrylic in the correct thickness, square and smooth the mating edges, position the panels with a jig, apply a compatible acrylic solvent cement, allow full cure, then leak-test outside the living space. Avoid using generic construction adhesive, hot glue, or household super glue for structural aquarium seams.
Acrylic scratches more easily than glass, so use acrylic-safe cleaning pads and keep sand grains away from the viewing panels. Its lighter weight can be useful for custom cabinetry, but the filled aquarium still needs a strong, level stand.
Option 2: Use a Safe Plastic Tub for a Utility Aquarium
A heavy-duty plastic tub can work well for quarantine, breeding, plant grow-out, fry rearing, or a temporary fish-holding system when the container is made from suitable material and is strong enough to hold water without excessive bowing. The lack of front viewing glass is the main trade-off.
Choose a new, clean container whose manufacturer documents the plastic type and intended use. Avoid thin storage totes that deform dramatically when full. Support the base completely, keep heaters from resting directly against plastic, and use a lid or mesh cover for jumping species.
This approach is practical when the goal is function rather than furniture. It is also easier to move and cheaper to replace than a custom display aquarium.
Option 3: Polycarbonate and Other Specialty Materials
Polycarbonate is extremely impact resistant but is not the first choice for most beginner display tanks. It scratches easily, can be more challenging to bond, and requires a construction system suited to the specific sheet. For small experimental enclosures, transparent food-safe plastics may work, but only when they are designed to remain stable under water load.
Do not treat “plastic” as a single material category. Different plastics respond differently to heat, UV exposure, solvents, stress, and long-term water contact. If the manufacturer cannot tell you what the container is made from, do not make it the permanent home for fish.
When a Non-Glass Build Is the Better Choice
Acrylic is useful for unusual shapes, lighter display tanks, drilled systems, and locations where impact resistance matters. A plastic tub is excellent for temporary care, quarantine, or breeding. Glass remains attractive for standard rectangular home aquariums because it resists scratches, is widely available, and has predictable construction methods.
So How to make fish tank at home without glass is not really about eliminating glass at any cost. It is about choosing a material whose structural properties, chemical compatibility, visibility, and maintenance needs match the purpose of the aquarium.
Homemade Fish Aquarium Ideas for Beginners and DIYers
The best Homemade fish aquarium ideas combine visual style with practical maintenance. A design should leave swimming space, allow water circulation, provide hiding areas where appropriate, and keep heaters and filter intakes accessible.
Natural Planted and River-Style Designs
A low-tech planted aquarium is one of the most forgiving looks for a freshwater DIY setup. Use a dark substrate, a few pieces of aquarium-safe driftwood, smooth stone, and hardy plants such as Anubias, Java fern, Cryptocoryne, or Java moss. Attach epiphyte plants to wood or rock instead of burying their rhizomes.
For a river-inspired layout, angle rounded stones and wood in one direction to suggest flow. Leave an open channel at the front or center for fish to swim. A darker background can hide cords and make the aquascape appear deeper.
These styles work especially well in 10- to 40-gallon rectangular aquariums because there is enough horizontal space to create depth without filling every inch with decoration.
Minimalist, Blackwater, and Biotope-Inspired Ideas
A minimalist aquarium uses negative space as part of the design. Instead of covering the whole floor, choose one strong rock or wood composition, a small plant group, and an open sand or gravel area. This makes cleaning easier and gives active fish unobstructed swimming room.
A blackwater-inspired aquarium uses driftwood, botanicals such as aquarium-safe leaves, subdued lighting, and tannin-tinted water to imitate forest streams. It can be visually dramatic, but research the fish first; not every species needs acidic or tannin-rich conditions.
A biotope-inspired aquarium takes the concept further by choosing fish, plants, substrate, and hardscape that resemble one geographic habitat. You do not need perfect scientific replication for a home display, but using habitat research to guide the design often creates more coherent results.
Space-Saving Fish Aquarium Design Ideas
Useful Fish Aquarium Design Ideas for smaller homes include a compact rectangular tank on a dedicated cabinet, a shallow planted aquarium on a sturdy console, or a corner-oriented setup that still leaves service access. Avoid ultra-tiny novelty tanks simply because they occupy less space. Small water volumes can change temperature and chemistry quickly.
A vertical aquarium may look efficient, but tall tanks can reduce usable horizontal swimming space and make maintenance harder. Choose the shape based on the fish rather than the room alone. A school of active midwater fish usually benefits from length; some sedate species can use a more compact footprint if their care requirements are still met.
Wall-mounted and built-in designs should be treated as construction projects. They need ventilation, access panels, power planning, spill containment, filtration space, and structural support. A tank that is visually “flush” with a wall still needs room for a human hand, siphon, net, and filter service.
Upcycled Looks Without Unsafe Upcycling
Creative Homemade fish aquarium ideas often use old televisions, furniture, jars, bottles, or unusual containers. The safer approach is to reuse the outer shell as décor while placing a proper aquarium inside it. For example, an old cabinet can become an aquarium stand and canopy after reinforcement; an empty retro television shell can frame a correctly sized manufactured tank.
Do not place live fish directly in a bottle, tiny jar, decorative lamp base, or unverified vintage container. A clever visual concept is only successful if the aquatic habitat remains stable, accessible, and large enough for its inhabitants.
Fish Aquarium Design for Home: Placement, Style, and Safety
Back to Table of Contents
A successful Fish Aquarium design for home begins with location. The best position is not simply the wall that looks empty; it is the place where the stand can be supported, the tank can be serviced, and sunlight, heat, vibration, and traffic are manageable.
Choose the Best Room and Position
Place the aquarium near electrical power and within practical distance of a water source, but not where splashes can threaten outlets. Avoid direct sunlight, heating vents, fireplaces, radiators, and areas with large temperature swings. Direct window light can also increase algae and heat the water unpredictably.
Keep the aquarium where you will actually observe it. Regular observation is one of the best maintenance tools because you notice changes in fish behavior, water clarity, flow, or equipment noise early.
Leave enough room around the tank for a siphon bucket, filter removal, lid opening, and plant trimming. If the aquarium is squeezed tightly between cabinets, every water change becomes harder.
Match the Aquarium to Your Interior Style
For modern rooms, use a simple rectangular tank, black or natural-wood cabinet, hidden cables, and one restrained aquascape focal point. For a warm organic interior, combine driftwood, rounded stones, green plants, and a wood-toned stand. For a minimalist office, keep equipment visually clean and avoid overstocking.
A Fish Aquarium design for home should also consider sight lines. Place the main aquascape focal point slightly off-center and arrange hardscape so it looks intentional from the primary viewing angle. Use a background when cables or wall colors distract from the fish.
Furniture-style aquariums, room dividers, and coffee-table tanks can look impressive, but they often create maintenance or welfare compromises. Prioritize top access, gas exchange, safe lighting, and protection from accidental knocks over novelty.
Calculate Floor Load and Stand Capacity
Because each gallon of freshwater weighs roughly 8.34 pounds, the water in a 55-gallon aquarium alone weighs about 459 pounds. Add the tank, stand, substrate, rocks, equipment, and water displaced into filters or sumps, and the real system weight becomes substantially higher.
For ordinary small aquariums on sound household floors, a purpose-built stand is usually the main requirement. For very large aquariums, older buildings, upper floors, wall-integrated installations, or unusual point loads, consult a qualified building professional rather than relying on online rules of thumb.
Never place a tank where the stand overhangs the furniture surface. Check that all corners are supported according to the manufacturer’s design and that the stand remains level after filling.
Design for Maintenance From Day One
The most beautiful aquarium will decline if maintenance is difficult. Provide a clear route for a bucket or hose, removable lighting, accessible filter media, and enough clearance to reach the bottom. Keep a dedicated towel and aquarium-only tools nearby.
Plan a regular light schedule rather than leaving lights on continuously. RSPCA guidance suggests roughly eight to ten hours of daily artificial lighting for many fish setups, with darkness at night. Plant needs vary, so start conservatively and adjust according to growth and algae.
A clean design is not one with hidden equipment at any cost. It is one in which equipment is organized, safe, serviceable, and visually secondary to the aquarium itself.
How to Make Fish Tank for School Project
When parents or students search How to make fish tank for school project, they may mean either a real aquarium or a craft model. Those are very different projects. A dry diorama is usually the better classroom choice because it teaches aquatic ecosystems without requiring long-term animal care or transporting live fish.
Option A: Make a No-Live-Fish Aquarium Diorama
Use a shoebox, clear plastic display box, or foam-board frame. Add blue paper or paint to the back, clean gravel or craft sand to the bottom, paper or plastic plants, and handmade fish suspended on transparent thread. Label habitat zones, producers, consumers, decomposers, oxygen exchange, or a simple food chain.
This version is cheap, portable, safe for classrooms, and easy to grade. Students can explain how real aquariums need filtration, oxygenation, stable temperature, cycling, and water testing without placing an animal in a temporary project container.
To make the project more scientific, include a small diagram of the nitrogen cycle showing ammonia to nitrite to nitrate. Add a short card explaining why a real aquarium must be cycled before normal stocking.
Option B: Build a Real Demonstration Aquarium
If a teacher specifically approves a live aquarium, use a proper aquarium rather than a cardboard or improvised craft container. A 10- to 20-gallon freshwater tank is easier to stabilize than a tiny bowl, but the appropriate volume still depends on the intended species.
Set the aquarium up well before presentation day. Install filtration, condition the water, establish the biofilter, test ammonia and nitrite, and plan who will maintain the tank after the project ends. A living animal should not become disposable when the grade is complete.
Students can record temperature, pH, ammonia, nitrite, and nitrate in a simple observation table, turning the aquarium into a real biology experiment about ecosystems and microbial processes.
What to Explain During the Presentation
A strong How to make fish tank for school project presentation should explain why the tank needs a filter, where beneficial bacteria live, how fish waste becomes ammonia, how plants use nutrients, and why partial water changes are necessary. It should also explain that clear water is not automatically safe water because ammonia and nitrite can be invisible.
Bring before-and-after photos rather than moving a mature aquarium unnecessarily. If the project uses a diorama, label it clearly as a model and explain what would be different in a live system.
Cycling, Stocking, and Maintaining Your DIY Aquarium
Back to Table of Contents
A homemade aquarium is complete only when it can support stable water quality. This section is where many DIY guides stop too early. Leak-free construction is only the first half of the project; biological maturity and routine maintenance determine whether fish thrive.
Cycle the Aquarium Before Normal Stocking
Cycling establishes nitrifying bacteria that convert toxic ammonia to nitrite and then to nitrate. Use a reliable liquid or strip test system that includes ammonia and nitrite, plus nitrate and pH. A fishless method avoids deliberately exposing fish to elevated ammonia or nitrite.
During cycling, keep the filter running continuously. Beneficial bacteria colonize filter media, substrate, and other wet surfaces; they are not primarily “in the water.” Do not replace all biological media at once after the tank becomes established.
A fully established aquarium should show zero ammonia and zero nitrite under its normal biological load, with nitrate kept at a manageable level through plants and partial water changes. Cycling may take several weeks. Resist the urge to “speed it up” by adding a full population of fish.
Add Fish Slowly and Match Species Carefully
Once water tests show the tank is ready, add livestock gradually. Check compatibility before purchasing. Consider adult size, group requirements, swimming zone, temperament, temperature, pH range, hardness preference, and feeding behavior.
Do not choose fish solely because they are small at the store. Many species are sold as juveniles. Goldfish, plecos, cichlids, and several popular catfish can outgrow casual beginner setups. A fish that physically fits into a tank is not automatically appropriate for that tank.
Quarantine new fish when practical, especially for established community aquariums. Observe appetite, breathing, fins, skin, and behavior. Sudden hiding, gasping, clamped fins, or refusal to eat should trigger a water-quality check before medication is considered.
Create a Simple Maintenance Routine
A practical weekly routine is to observe the fish, check temperature, test water as needed, remove dead plant material, clean the viewing panels, and perform an appropriate partial water change based on nitrate, stocking, feeding, and species needs. Use a siphon to remove debris from accessible substrate.
Treat replacement tap water before or as it enters the aquarium according to the conditioner directions. Match temperature closely enough to avoid a sudden change. Never perform a routine 100% water replacement in a stable aquarium unless there is a specific emergency reason and you understand the consequences.
Rinse reusable filter sponges or biological media gently in removed aquarium water or conditioned water when flow drops. Do not sterilize the entire filter during ordinary maintenance. The goal is to remove sludge while preserving the microbial community.
Use Plants and Feeding to Improve Stability
Live plants can absorb nitrogen compounds, provide shelter, reduce visual stress, and compete with algae for nutrients. They are not a substitute for cycling or water changes, but they can contribute to stability. Easy plants such as Anubias, Java fern, Java moss, and many Cryptocoryne species work well in low-tech setups.
Feed only what the fish can consume appropriately and remove persistent leftovers. Overfeeding creates extra waste, increases ammonia production, encourages algae, and can harm fish. It is safer to feed a modest amount consistently than to use food as entertainment.
For vacations or weekends, healthy adult fish often cope better with a brief reduction in feeding than with an untested automatic feeder dumping excess food. Species needs vary, so plan ahead rather than making a universal fasting rule.
Costs, Common Mistakes, and Troubleshooting
The cheapest aquarium is not the one with the lowest purchase price. It is the one that remains safe, stable, and easy to maintain. Replacing failed seams, sick fish, warped furniture, or undersized equipment costs more than planning correctly at the beginning.
DIY vs. Ready-Made Aquarium Comparison
| Factor | DIY Tank Shell | Ready-Made Tank + DIY Setup |
| Custom dimensions | Excellent | Limited to available sizes |
| Up-front learning | High | Moderate |
| Leak risk | Higher if inexperienced | Lower when tank is undamaged and correctly supported |
| Tool requirement | Medium to high | Low |
| Best for beginners | Only with proven plans and small/simple builds | Usually yes |
| Creative aquascaping | Excellent | Excellent |
| Repair responsibility | Fully yours | Manufacturer guidance may be available |
For most first-time aquarists, a ready-made tank with a DIY background, stand finish, planted layout, sponge filter, or custom hardscape gives the best balance of creativity and reliability.
Eight Mistakes That Cause Most DIY Problems
The first mistake is building too small. Tiny tanks seem easy but give you less water volume to dilute waste or temperature changes. The second is choosing a container before choosing fish. The third is using the wrong adhesive or sealant. The fourth is placing a tank on furniture not designed for the filled weight.
The fifth mistake is adding fish before the biological filter is ready. The sixth is treating clear water as proof of safe water. The seventh is overfeeding. The eighth is making maintenance difficult by trapping the tank in a cabinet, hiding filters where they cannot be serviced, or decorating so densely that debris cannot be removed.
A ninth mistake deserves special mention: copying viral DIY videos without checking long-term suitability. A container can hold water for a few minutes on camera yet still be too small, chemically unsuitable, structurally weak, or impossible to filter responsibly.
Troubleshooting Leaks, Cloudy Water, and Algae
If a new DIY tank leaks, drain it and diagnose the seam. Do not keep fish in it while “watching” the leak. A structural seam should be repaired using the correct method for the tank material and then leak-tested again.
Cloudy water in a new aquarium can be caused by suspended dust or a bacterial bloom. Test ammonia and nitrite rather than adding random clarifiers. If the tank is cycling, temporary cloudiness may occur while microbial populations change.
Algae is usually a balance issue involving light, nutrients, plant growth, and maintenance. Reduce excessive lighting, remove algae manually, avoid overfeeding, and maintain water quality. Do not buy an “algae eater” as a cleaning tool unless the species is genuinely appropriate for your tank when fully grown.
If fish gasp at the surface, become lethargic, or show sudden abnormal behavior, test water immediately. Check temperature, filter operation, oxygenation, and whether any chemical or untreated tap water entered the tank. Water quality is one of the first variables to investigate.
Build a Better Homemade Fish Aquarium Kit Over Time
Your first homemade fish aquarium kit does not need every gadget. Start with reliable essentials, then improve the setup after you understand its real needs. Useful upgrades include a better light for plants, a pre-filter sponge, a timer, a second thermometer, a battery-powered air pump for outages, or a quarantine tank.
Avoid solving every problem by buying another chemical. Testing, water changes, appropriate stocking, stable temperature, good feeding, and a mature biological filter do more for long-term success than a shelf full of quick fixes.
FAQ: Homemade Fish Aquarium Questions
Back to Table of Contents
Can I make a homemade fish aquarium safely as a beginner?
Yes. The safest beginner approach is to use a commercially manufactured glass or acrylic aquarium and customize the stand, filtration, background, plants, and décor yourself. Building the tank shell is possible, but seam quality, material thickness, bracing, curing, and leak testing must all be correct before livestock is added.
How to make fish tank at home without glass?
Use properly sized cell-cast acrylic for a permanent clear tank, or a strong purpose-suitable plastic tub for a temporary or utility setup. Both must be chemically safe, structurally supported, and leak-tested. Avoid thin storage bins, unknown recycled containers, or generic adhesives that were never designed for long-term submerged aquarium use.
What should be included in a homemade fish aquarium kit?
At minimum, include a safe tank, level stand, filter, water conditioner, test kit, thermometer, heater if the species requires one, light, lid when needed, substrate or bare-bottom plan, aquarium-safe décor, siphon, dedicated bucket, and suitable food. Add equipment based on the fish rather than buying unnecessary gadgets first.
What are the easiest Homemade fish aquarium ideas for a first tank?
Simple planted layouts are among the easiest Homemade fish aquarium ideas. Use one main piece of driftwood or rock, a few hardy plants, open swimming space, and a dark background. This design is easy to clean, hides equipment well, and looks intentional without requiring advanced CO2 injection or complicated hardscape construction.
What are good Fish Aquarium Design Ideas for a living room?
Practical Fish Aquarium Design Ideas include a rectangular planted tank on a dedicated cabinet, a nature-style tank with hidden cords, or a shallow aquascape with open swimming space. Choose a location away from direct sunlight and heat, leave maintenance access, and design the stand for the aquarium’s complete filled weight.
How to make fish tank for school project without keeping live fish?
Build a labeled shoebox or clear-box diorama with craft gravel, paper plants, suspended fish, and a diagram of filtration or the nitrogen cycle. This is often the best How to make fish tank for school project option because it is portable, inexpensive, educational, and does not create a long-term animal-care responsibility after grading.
How long should a homemade aquarium cycle before adding fish?
Do not use time alone. Cycling commonly takes several weeks, but the tank is ready only when its biological filter can keep ammonia and nitrite at zero under the intended load while nitrate remains manageable. Test regularly, keep filtration running continuously, and stock gradually rather than adding many fish at once.
Is a small bowl easier than a real aquarium?
Usually not. Very small water volumes change temperature and chemistry quickly and often cannot accommodate effective filtration or enough swimming space. A properly equipped, species-appropriate aquarium is generally more stable and easier to manage. Choose the largest practical tank that fits the fish, your space, your budget, and a safely supported location.
Conclusion
A successful homemade fish aquarium is equal parts DIY project and living ecosystem. First, choose a safe container and support it for the full filled weight. Second, build the life-support system around filtration, conditioned water, stable temperature, cycling, and species-appropriate space. Third, make the design easy to maintain so the aquarium still works months after the first photo.
Whether you choose glass, acrylic, a practical non-glass utility tank, a planted living-room display, or a no-live-fish school model, the best result is the one that stays safe for both people and aquatic life. Start with a written plan, buy or build the essentials before choosing fish, leak-test carefully, and let water-test results guide stocking. Then use your creativity on the part of the project where it belongs: building a healthy underwater scene you can enjoy for years.
